Showing posts with label Spine. Show all posts

Friday, March 25, 2016

Getting Rid of the "Butt Wink"


The "butt wink" is a term that has puzzled personal trainers and other movement practitioners. Some people attribute it to tight hamstrings, others have mentioned ankle mobility, some say it's hip flexor strength, or even hip/femur anatomy. My two cents? Motor control. Everyone I've met who had a "butt wink" was able to eliminate it with some proper cuing and movement sequencing.

If you're not sure what a butt wink is, and if you have one, let me enlighten you: this is a term used to describe lumbar flexion in the bottom of a squat (pictured below).

Oof.
Now, let's first touch upon some other theories contributing to this fault...

Dr. Quinn Henoch mentions that the hamstrings cannot be responsible for the butt wink: "The hamstrings are a two joint muscle.  When you descend into a squat, the hamstrings are being lengthened at the pelvis, but shortened at the knee. So it would seem to me that the net length change is negligible." The hamstrings are not a likely culprit.

Hip anatomy makes the most sense out of all theories. Some individuals are just going to be better at squatting, out of sheer, genetic fortune. If you have the right anthropometry (limb length), you're gonna be a better squatter, plain and simple. 

Anatomical factors aside, though, it is possible to eliminate the dreaded butt wink with a little bit of practice and tweaking.

I'm not going to get too much into the hip and femur anatomy here, because I think Dr. Ryan DeBell covers that nicely. If you want to read his article on it, check out the works cited below. What I will say, though is that factors like your acetabulum (hip socket) alignment, femur length, and tibia/fibula length will all influence your squat stance. Some people have to squat wider than others, so playing around with your stance will greatly help your bottom position.

You want to work through a range of motion where you can maximize the integrity of the movement. If, initially, that means that you're squatting just to parallel, then so be it. Over time, the goal is to get progressively lower.

I usually start out my clients with a quadruped rocking drill. This will teach them how to hinge at the hips without load and minimize any lumbar flexion. If you find yourself reverting to the butt wink on this drill, move slower and focus on keeping the core engaged.

Once they grasp this concept, I would then progress them to the assisted squat drill. The goal here is the same as that of the previous drill, but now we're upright and preparing for a load-bearing squat.

Congratulations! Now you're ready to try an air squat without assistance! A couple of things to keep in mind: if my core isn't engaged, and I shift into an anterior pelvic tilt (hyperextension), then it's impossible for me to avoid lumbar flexion. If, however, I maintain a nicely braced position and descend straight down, I should be just fine. You want to imagine "pulling through your hip flexors" as you lower yourself.  If you're squatting high bar or front squatting, you will descend straight down, and if you're squatting low bar, then the hips need to come back more.

With a little bit of reverse engineering, even the most troubled squats can minimize the "butt wink." Sometimes you need to regress in order to progress. When you lay a solid foundation for quality movement, you can get a squat PR without looking like Quasimodo.

Friday, February 13, 2015

Breathe Your Way to Bigger Lifts


Check yourself: as you read this, are you taking deep, full breaths, or is your breath shallow and inconsistent?

I've found that my clients have the tendency to forget to breathe as the they lift. They're getting ready for a max back squat and they step under the bar with a completely unstable abdomen.

You take, on average, over 20,000 breaths per day, yet somehow, in today's stressful society, breathing is not always automatic. When people are anxious or preoccupied, they may forget to breathe, or their breathing may not be of adequate depth.

The respiratory system, courtesy of www.philschatz.com.
Now, above I've placed a photo of the respiratory system. As you can see, there is a lot going on there. Many people who are stressed or are in the sympathetic nervous system response (fight or flight), will breather primarily through the neck and chest--this is usually easily visible. Someone who is calm and in the parasympathetic nervous system should breathe through the diaphragm, and you will note that their bellies and lower ribcages will expand as they inhale.

The respiratory system obviously provides our brains with oxygen, but it also helps to stabilize our abdomens. When we inhale, the diaphragm contracts and presses up against the lungs, and as we exhale, the diaphragm relaxes.

A proper diaphragmatic breath helps us create intra-abdominal pressure. On a compound movement like a squat, deadlift or bench press, maintaining that intra-abdominal pressure is imperative for safety of the spine and maximal power output.

He may be cute, but we certainly don't want to emulate his physique!

My friend Wileen, a Licensed Massage Therapist and practitioner of NeuroKinetic therapy, gave me this wonderful example--she said that without sufficient intra-abdominal pressure, the body is much like the Slinky Dog in "Toy Story." Essentially, the abdomen will be soft and unprepared to handle a sufficient load.

Would you rather lift with a body like that of Slinky Dog or that of Buzz Lightyear? I have my money on Buzz Lightyear any day of the week.

A heavy lift requires a substantial amount of tension in the body, from the feet, all of the way up to the torso. Without that necessary rigidity, the risk of injury is exponentially higher, and the amount of energy we are wasting comes in droves.

A strong core creates bigger lifts. We can't optimize the strength of the thorax without proper spinal bracing via the breath, so therefore, a stronger breath means more weight on the bar! You follow me?

Now, down to the nitty gritty. You may be wondering how you should breathe on these big lifts. There is a technique that many lifters employ called the Valsalva maneuver. This is just one way to breathe to take advantage of the intra-abdominal pressure. I will warn, though, that anyone who has a history of high blood pressure should not breathe this way, as it does raise the blood pressure even more. Ideally, we want to inhale through the nose, which facilitates a full contraction of the diaphragm. Then, we should engage the abdominals. I tell my clients to imagine like I'm going to punch them in their stomachs. Once they have that down, they may begin the movement. During the hardest part of the movement, or the end of the concentric phase (think of standing up on a deadlift or squat or locking out an overhead press), they should forcefully exhale through the mouth. If they are doing a set with multiple reps, they should repeat this before each repetition.

This photo of the Valsalva maneuver in action demonstrates an iron clad core. As you can see, the airway is cut off and the diaphragm is contracted abdominal cavity expands. This individual is ready to move big weight.

Many people use lifting belts to enhance this effect. The belt acts as somewhat of a tactile cue to improve that core stabilization. I won't get into that too much today, though, as that is enough material for an entirely new post.

As you can see, the way you breathe has a profound impact on your performance, both in and out of the gym. It's is extremely important to learn how to maintain intra-abdominal pressure throughout a heavy lift for both efficacy and safety.

Friday, February 6, 2015

Your Hips Don't Lie...Or Do They?


We'd all like to move our hips like Shakira (or maybe that's just me). One thing I've noticed, though, in many of my clients, is that the cue "hinge at the hips" usually raises confusion. The fact is that many people I've met do not know the difference between bending at the hips and bending at the waist. I am to put an end to this gray area.

Whether you're picking something up from the floor or preparing yourself for a deadlift PR, it's crucial, for the longevity of your spine, to learn how to properly load the hips.

This guy knows how to drop it low.
Take a look at the photo: which one looks safer? If you were going to pick up your dining room table while moving into a new house, what do you think would be the safest and most mechanically optimal way to do so? Which position would allow someone to efficiently deadlift upwards of 500 pounds?

I'm guessing (and hoping) you picked the photo on the left.

The photo on the right will place excessive shear force on your intervertebral disks and prevent you from properly engaging the powerful forces that are the erector spinae, the gluteus maximi and the hamstrings complex.

Look at that hip hinge...
To help clients learn to hinge at the hips, I have them lift up one leg and place a hand in the crease of the hips. Once they've established this placement of the hands, I ask them to keep their hands there and try to bend and squeeze their hand with their hips as they push their butts back towards the wall. This tactile cue allows them to feel how they should load a weighted movement.

You'll know you're hinging at the hips properly when you feel a nice stretch in your hamstrings at the bottom of the movement--this allows us to use that elastic capacity to extend the hips as we stand.

You should lift both a laundry basket and a barbell in the same manner: loading the hips and bracing the core. When used properly, the hip extensors (like the hamstrings and the glutes) can produce an incredible amount of power. When misused, we run the risk of injury and we are limiting the full potential of the posterior chain.

Your glutes are (arguably) the biggest muscles in the body, so why wouldn't you want to take full advantage of them while lifting heavy weight?

If you want to learn to move like Shakira, the first step is to understand how to prime the hips for movement.

Friday, January 30, 2015

"Neutral Neck:" How to Avoid Straining the Neck While Lifting


It's relatively common knowledge that during the big lifts, you should keep your back flat--some refer to this as a "neutral spine." Despite this, many people forget about the cervical part of the spine, or the neck.

Ideally, on a clean, snatch, deadlift or squat, the neck should stay in line with the rest of the spine. Once the weight gets heavy, however, one may start to compensate by hyperextending his neck as a lifeline. Instead of engaging larger muscles like the latissimus dorsi and the erector spinae, his cervical extensors are now taking the brunt of the work; compensatory patterns like these can lead to big problems over time.


Do not deadlift like this guy. 


To rectify this, I will have my clients find a spot about 3-4 inches in front of them. I will tell them to focus on this point throughout the entire lift. I will also place a PVC pipe behind their backs to help them find a more neutral position: this cue gives them tactile feedback of where their heads should rest.

Maintaining a neutral position of the head will allow you to properly engage your posterior chain while keeping your neck free from overexertion. Stop cheating yourself and find true strength. Movement efficiency is the key to longevity.

Monday, March 17, 2014

Why You Need to Have a Big Butt

Having a big butt is certainly preferable for models twerking in rap videos, but it's also extremely important in athletic performance. Weather you're a soccer player, a running back or just simply working out to maintain a healthy lifestyle, you need to make sure you're giving your butt the attention it deserves.

I know what you're thinking: "But Arianna! I can squat 250 pounds. My glutes are really strong!" In a perfect world, you would achieve glute activation in the back squat, but many of the back squats I see people execute in the gym make use of the anterior quadriceps muscle and recruit minimal activation from their posterior chain. The truth is, if you are a predominantly sedentary person (meaning you sit for 4+ hours a day at home or at work), you probably don't know how to correctly activate your glutes because you're not using them for the majority of the day. Fear not--you are part of the American majority who sits at a desk job all day. It's no wonder that we don't know how to activate the right muscle groups considering we don't use them as often as we should.

Underactive or weak glutes can cause a ton of problems, including lower back pain, knee pain, IT band syndrome, and a whole slew of other maladies. Your quadriceps may be strong enough to squat 250 lbs, but guess what? If you learned how to activate your glutes properly, you would easily squat over 300 lbs.
The gluteus maximus (one of three muscles that make up what we collectively call the "glutes") is the biggest muscle in your body. Now, if we learn how to properly employ the strength of this tremendous group of muscles, we are going to see some real magic happen. Whether we're doing a deadlift, a squat, a box jump or a clean and jerk, we need to learn to properly harness the power from our glutes in order to move the most amount of weight and avoid injury.

In order to utilize the strength of the ever-powerful gluteal muscles, we must focus on activating them. Some great exercises can be found in my previous article about warm-ups, but I'll list a few more that I really like here:
Once you learn to properly engage your posterior chain, you will see tremendous gains in strength while simultaneously protecting your body from injury. If you have humongous quadriceps and a small butt, that should be a red flag to you that your glutes needs some more attention. Channel your inner Nicki Minaj and start building a bigger booty!

Friday, November 8, 2013

Sitting Is a Killer


What are you doing right now?

Chances are you're sitting at your desk as you read this. We sit on the couch to watch TV, get up to sit in our cars, sit at our desks at work and then repeat this vicious cycle the next day. Nearly all of us are guilty of spending too much time on our bums.

Unless you're one of the lucky few (like me) who work on her feet, you're probably sitting down for at least 8 hours a day. The unfortunate truth is that, even if you workout semi-regularly, when we sit, we are wreaking havoc on our bodies. Low back pain? Tight hips? These things are likely the result of you being seated for extended periods of time.

Human beings are not meant to be sedentary animals. We evolved as hunter-gatherers, and at that time, we were probably not sitting for any length of time; we were out on our feet for hours on end trying to find food to feed our families. Even when we were sitting, we weren't sitting in a "chair" as we know it today--we were probably sitting on the ground or a stone/stump/something of the like. We are meant to be active, and our bodies were made to move.

Image courtesy of www.drfox.co.uk
So why is sitting so dangerous? For one, when we sit, our hamstrings are shortened, and our glute activation turns off. Further, our hips are closed for extended periods of time. Our bodies adapt to what we do often, and if sitting is what we are most frequently doing, it will adapt to sitting! If our hips and hamstrings are shortened for extended periods of time, our muscles and connective tissues become adaptively short to accommodate this position. It is no wonder why our society is so inflexible!

Here are some other scary truths about sitting:

  • Energy expenditure drops to 1 calorie per minute
  • Fat burning enzymes decrease their rate by 90%
  • After two hours of sitting, your HDL cholesterol drops by 20%
  • People with sitting jobs are 2 times more likely to get some form of cardiovascular disease
  • Sitting time has increased by over 8% since 1980
So what are your options? The standing workstation has gained a lot of popularity within the past year or two. If this is not feasible for you, your best bet is getting up every 30-45 minutes and stretching, maybe taking a lap or two around the office.


Saturday, October 26, 2013

Brace Yourself: Focusing on Your Posture


Our posture is the foundation of every movement we make. Whether we're sitting, going for a jog, or doing a deadlift, proper spinal positioning is crucial to both preventing injury and the efficiency of your movement. The fact of the matter is that the movements you're resorting to at your computer desk are going to translate to your movements in the gym.

So what is considered "good posture?" Dr. Kelly Starrett, author of Becoming a Supple Leopard: The Ultimate Guide to Resolving Pain, Preventing Injury, and Optimizing Athletic Performance breaks it down into three easy steps:

  1. Squeeze your butt
  2. Align your ribcage with your pelvis
  3. Tighten your core (about 20% tension for low-impact activities like sitting, 100% for a max deadlift)
  4. Neutralize your head position and roll your shoulders back into a good position
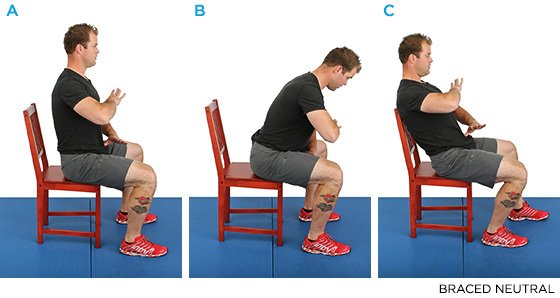
Ideally, these 4 cues will lead you to a safe position regardless of the task. As I mentioned a few weeks ago in my post about core strength, a nice, strong core is essential to proper posture. Our core prevents our lower backs from arching and stabilizes our hips and shoulders. In these images, Dr. Starrett illustrates these concepts. As a point of reference, he places one hand under his breastbone (sternum) and another hand on his pubic bone. If your posture is aligned properly, your hands will be parallel to one another.


Image A illustrates a properly braced spine. In Image B, Starrett rounds his shoulders, and in Image C, his lower back is excessively arched.
Here, Kelly demonstrates all of the positions you can sit in comfortably with a braced spine.


So next time you're sitting at your desk at work, take a moment to focus on your posture. Are your shoulders rounding forward? Are you arching your lower back too much? If you are, simply stand up, follow the bracing sequence, and sit back down.