
Showing posts with label Midline stability. Show all posts
Showing posts with label Midline stability. Show all posts
Friday, August 28, 2015
Why I Only Train My Core Isometrically, and Why You Should Too
My friend Michael was nice enough to write a guest post for me this week! Michael is a competitive weightlifter who has been performing the olympic lifts for a little over 2.5 years. He recently obtained his Honors Bachelors of Science in Kinesiology and plans to go on to complete a degree in Physiotherapy. He has gathered a lot of hands on experience working in a physiotherapy clinic for the last five years and is passionate about human strength and performance. In his spare time, he enjoys long walks on the beach and romantic comedies.


Friday, July 24, 2015
Check Your Ribs! 4 Exercises to Fix Your Rib Position
 What's wrong with this picture?
Yes, this model has an incredibly impressive physique, but I'm referring specifically to her posture. Her ribs, in particular, are the first thing I notice.
Rib flaring is an extremely common postural fault. I mainly see this in women, but there are many men who are guilty of flaring ribs as well.
You might be thinking, "you can only see her ribs because she's so lean!" or " maybe that's just the way her ribs are!" No. Her ribcage sits that way because of core instability and a lack of thoracic awareness.

If the ribcage protrudes in front of the hips, we cannot properly engage the rectus abdominis, and, thus, the function of the muscles around shoulders, hips, knees, and ankles will be compromised.
Additionally, the ribs will pull forward your center of gravity and affect your balance, along with your gait. Any movement will be altered, because your ribs are, quite literally, several steps ahead of you.

At the other end of the spectrum, take a look at Georges St. Pierre, a professional MMA fighter. You will notice that his core is rock solid and stable, unlike the bikini model in the above picture. Maybe that's why he's one of the most successful (and highest paid) fighters! Which of these individuals do you think has a stronger abdomen?
Someone's standing posture will tell you a lot about how their bodies will move during weighted exercises. Just imagine how both of these individuals will look once they press barbells overhead. The lifter with a flared ribcage will almost, 100% certainly, be hyperextended, while an individual with proper abdominal bracing can maintain a secure position.
Sometimes, a prominent ribcage will not be immediately visible while standing. In this case, I employ the wall slide test. If a client cannot bring their forearms to the wall without reaching their ribs forward, they fail the test. I now know that they have limitations in the shoulder, and I work from there.
 |
| This model does NOT pass the test... |
When I see someone with ribs like the woman in the first photo, I immediately check their breathing. I am never surprised to see that these people abuse the muscles in their necks and chests to breathe rather than taking advantage of their diaphragms. Often, breathing alone will make a huge impact in the position of the ribs. Aside from doing breathing drills, I like to use the following exercises to teach my clients how to activate the muscles that retract the ribs:
Teaching proper joint alignment will allow for optimal posture and mechanics in all activities. Strive to employ better movement patterns. Don't lift weights you can't move without perfect technique. You may limit your risk of injury, and you will be much stronger in the long run. Keep your ribs down, and learn to utilize the core properly!
Thursday, June 4, 2015
Breathe Your Way to Bigger Lifts (Part 2)
A few weeks ago, I wrote a post on breathing properly for your lifts. This week, my friend Nate Henry, a competitive powerlifter, wrote a wonderful follow-up article. His strongest lifts include a 523.5 pound squat in competition, and a 535 pound squat in the gym, weighing 206 pounds. His best meet total is 1,372 pounds! He is also currently pursuing a bachelors degree in Kinesiology and an NSCA CPT. If you want to move big weights like this guy, follow his advice.
Brief Squat Overview (Kinesiology)
Before I get into anything, let's review all of the primary muscles that are used within the squat because a lot of people overlook them.
When you’re lifting or doing anything and figuring out what muscles are being utilized, you have to analyze the dynamic (moving) joint to be able to identify the muscles worked. The muscles being worked are the ones that are fighting against the load.
As you squat there is movement in these joints:
Rather than listing out all of the muscles involved, here are some nifty graphs I made to show what muscles are responsible for what movement:


Keep in mind these are only the primary muscles and these do not include the statically loaded muscles or the secondary muscles involved in the movements.
Now what?
Now that we’ve identified all the muscles we can get into this cueing business, the muscles will come into play a little later. Outside of reminding everyone reading this that their set up is the most important part of the squat (don't rush it, set up every set the same, etc.). I’m going to assume you’ve squatted before in your life, and I'll get right to it.
One of the biggest things that helped me advance my own squat was learning to properly brace and learning to “breathe into my lower back.”
A lot of lifters rant about “getting tight” and “getting your breath,” but what the heck does that even mean? It’s one of those things that if you know it, you get it. If you don’t, it’s hard to explain fully.
The whole point of getting “tight” or bracing is to prepare your body to handle load. Usually in the form of the Valsava Maneuver (holding your breath). However, a lot of people can’t even breathe correctly without load, so getting your breath and bracing properly is hard to do if you’re just starting out.
Rather than explaining it further, Arianna has written an awesome article already!
That breath and bracing is the most important and overlooked aspect of the squat next to having a proper unrack/walkout.
The reason this is so important is because if you’re not bracing completely you’ll put a lot of pressure on different muscles. We talked about spinal extension as one of the movements in a squat right? Well, when you’re just bracing the frontal core (the rectus abdominis plays a huge role in stabilizing the muscles responsible for spinal extension), you’re leaving your back completely unprotected, even with a belt! When you’ve got something heavy on you, that weight will zero right in on your weakest part of the back and that’s how back injuries happen and why.
This cue is especially important for low bar squatters who tend to use more extension in the back to leverage heavier weight on the way up.
To add to that, a lot of lifters might get the back tight (flexing it rather than creating the tension through the diaphragmatic breathing) and then tip forward because there is no brace on the front. This can also create some havoc within the muscles being worked. The quads may try to take proportionally more load than needed and the hip extensors try to pick up the slack. Things can get weird.
The point is, you need to brace and create that pressure. This is how I learned to do that.
Why breathe into my lower back?
Your core musculature wraps all the way around. A lot of lifters just breathe into their stomachs, creating little pressure, and not getting 360 degrees of tightness throughout all the musculature, extrinsically, nor intrinsically. They lack the understanding of what full abdominal expansion feels like; that’s where this cue comes in handy.
Put your hand on your lower back. Breathe into your stomach with a proper breath (fill it like a balloon). Not much going on in the lower back right? Or the sides, really, correct?
Now, do the same thing but try to breathe into the back while still trying to fill in the balloon (if that’s not helping, try to breathe into the lower back lying on your back and try to focus on pushing against the ground). If you’re doing this correctly, you should feel your back, stomach, and sides fill with air. Put your hands on your sides as well, you’ll feel it.
This is what I mean by breathing into your lower back. Proper inhalation helps your muscles in the core/lower back get tight/brace. Think of your core musculature as your body's own belt.
Using this, let's go over a quick squat without getting too much into the whole process:
I like using Chad Wesley Smith as an example, since he’s the one who introduced me to this cue. Here he is squatting 825 for a double.
Notice the control, the time put into the set up, and how he breathes. Now, Chad is an Elite Squatter. He’s quick about it. Take your time.
The cool thing is this applies to all disciplines: CrossFit, Powerlifting, Strongman, Weightlifting, Bodybuilding.
Try these tips, and add serious weight onto your lifts.
 |
| I mean...look at this guy. |
Brief Squat Overview (Kinesiology)
Before I get into anything, let's review all of the primary muscles that are used within the squat because a lot of people overlook them.
When you’re lifting or doing anything and figuring out what muscles are being utilized, you have to analyze the dynamic (moving) joint to be able to identify the muscles worked. The muscles being worked are the ones that are fighting against the load.
As you squat there is movement in these joints:
- Hip (femoral acetabular joint, femur connects in the acetabulum in the coxal bone)
- Knee (tibio-femoral joint, where the femur connects to the tibia)
- Ankle (taleo-tibula joint, where the tibia meets the talus)
- Spinal column (vertebral column)
- Sacroilliac (SI, or lumbo-sacral) joint which is where the column connects to the illiac.
- Hip extension
- Knee extension
- Plantar flexion (ankle)
- Spinal extension (and depending on the lifter, there can be a posterior or anterior pelvic tilt in the SI.)
Rather than listing out all of the muscles involved, here are some nifty graphs I made to show what muscles are responsible for what movement:


Keep in mind these are only the primary muscles and these do not include the statically loaded muscles or the secondary muscles involved in the movements.
Now what?
Now that we’ve identified all the muscles we can get into this cueing business, the muscles will come into play a little later. Outside of reminding everyone reading this that their set up is the most important part of the squat (don't rush it, set up every set the same, etc.). I’m going to assume you’ve squatted before in your life, and I'll get right to it.
One of the biggest things that helped me advance my own squat was learning to properly brace and learning to “breathe into my lower back.”
A lot of lifters rant about “getting tight” and “getting your breath,” but what the heck does that even mean? It’s one of those things that if you know it, you get it. If you don’t, it’s hard to explain fully.
The whole point of getting “tight” or bracing is to prepare your body to handle load. Usually in the form of the Valsava Maneuver (holding your breath). However, a lot of people can’t even breathe correctly without load, so getting your breath and bracing properly is hard to do if you’re just starting out.
Rather than explaining it further, Arianna has written an awesome article already!
That breath and bracing is the most important and overlooked aspect of the squat next to having a proper unrack/walkout.
The reason this is so important is because if you’re not bracing completely you’ll put a lot of pressure on different muscles. We talked about spinal extension as one of the movements in a squat right? Well, when you’re just bracing the frontal core (the rectus abdominis plays a huge role in stabilizing the muscles responsible for spinal extension), you’re leaving your back completely unprotected, even with a belt! When you’ve got something heavy on you, that weight will zero right in on your weakest part of the back and that’s how back injuries happen and why.
This cue is especially important for low bar squatters who tend to use more extension in the back to leverage heavier weight on the way up.
To add to that, a lot of lifters might get the back tight (flexing it rather than creating the tension through the diaphragmatic breathing) and then tip forward because there is no brace on the front. This can also create some havoc within the muscles being worked. The quads may try to take proportionally more load than needed and the hip extensors try to pick up the slack. Things can get weird.
The point is, you need to brace and create that pressure. This is how I learned to do that.
Why breathe into my lower back?
Your core musculature wraps all the way around. A lot of lifters just breathe into their stomachs, creating little pressure, and not getting 360 degrees of tightness throughout all the musculature, extrinsically, nor intrinsically. They lack the understanding of what full abdominal expansion feels like; that’s where this cue comes in handy.
Put your hand on your lower back. Breathe into your stomach with a proper breath (fill it like a balloon). Not much going on in the lower back right? Or the sides, really, correct?
Now, do the same thing but try to breathe into the back while still trying to fill in the balloon (if that’s not helping, try to breathe into the lower back lying on your back and try to focus on pushing against the ground). If you’re doing this correctly, you should feel your back, stomach, and sides fill with air. Put your hands on your sides as well, you’ll feel it.
This is what I mean by breathing into your lower back. Proper inhalation helps your muscles in the core/lower back get tight/brace. Think of your core musculature as your body's own belt.
Using this, let's go over a quick squat without getting too much into the whole process:
- Approach the bar, get your hand placement.
- Without rushing, get under the bar and get your placement down (high/low/hybrid). Dig into the bar, get the hands set, get everything nice and stable.
- Get your hips under you (both feet, not split stance this will prevent injuries in the back as well)
- Breathing into your lower back, and getting the full breath first, unrack the bar.
- Take your first step back, settle.
- Bring your other leg back, settle. Adjust this foot if need.
- If you’re squatting really heavy and the bar is whipping, let it settle. Good walks, make good lifts.
- If you let out some air during the walk, retake the breath but make sure you create pressure during the walkout phase because even though you’re not squatting, you’re still having to move around that weight.
- Squat
- Stand up
- Retake the breath (don't descend without completing the breath!)
- Repeat
I like using Chad Wesley Smith as an example, since he’s the one who introduced me to this cue. Here he is squatting 825 for a double.
Notice the control, the time put into the set up, and how he breathes. Now, Chad is an Elite Squatter. He’s quick about it. Take your time.
The cool thing is this applies to all disciplines: CrossFit, Powerlifting, Strongman, Weightlifting, Bodybuilding.
Try these tips, and add serious weight onto your lifts.
Thursday, April 9, 2015
Behind the Neck Exercises: Do You Need Them?
For every exercise, there's an equal and opposite, behind-the-neck variation. Behind-the-neck lat pull-downs, pull-ups, push presses, strict presses, are just a few examples of exercises I've seen people try to do behind their necks. Perhaps they're trying to hit the same muscle groups in a new way, or target different muscles altogether. Regardless of the reason, I am not generally a fan of the behind-the-neck training club.
Given the overwhelming number of shoulders stuck in internal rotation and spines stuck in kyphosis for the average desk-worker or sedentary individual, many people already come into the gym with a slew of shoulder restrictions and postural limitations. The shoulder is the most mobile joint in the body. Because of the huge range of motion in the joint, many people have poor stability overhead. Men and women alike suffer from scapular flaring (see below) as a result of lifestyle habits and poor posture.
 |
| She may look like she's at peace, but she's forcing her shoulders into an unstable position! |
For starters, let's analyze the neck position of someone doing an exercise behind his neck.

Now, let's move on to what might be happening to the shoulders in a movement like the lat-pull downs in the above photo.
As the result of the neck position, (because the human body works as a chain) his shoulder stability is also compromised. Ideally, his scapula should slide down the ribcage as he pulls the bar towards his traps. However, if the shoulders are internally rotated, the shoulder blade tilts forward and slopes off of the ribcage.
Many Olympic lifting coaches teach jerks or presses behind the neck, because it enables the athlete to keep his torso more upright in the dip. Unfortunately, for most, this might also damage the integrity of the shoulder position in order to maintain a vertical torso.
In an ideal situation, a behind-the neck exercise might be beneficial for an athlete. Unfortunately, the shoulder position is often compromised. If you have had shoulder issues in the past, you more than likely lack mobility or stability in the shoulder joint, and these types of exercises will just exacerbate your issues.
Unless you are certain you can sustain an ideal position in a behind the neck exercise, perhaps your routine is better off without them!
Tuesday, January 6, 2015
Just Say No to the Smith Machine
The squat, lunge, bench press and overhead press are all great exercises--they are compound movements that will help improve strength, power, and stability. Unfortunately, I see many people performing this movement on a machine that limits the benefits of these movements: the Smith machine.
 |
| Don't try this at home...or anywhere else, for that matter. |
You've probably seen this machine at your gym before. The Smith machine is where great exercises go to die.
The reason why I am so adamantly against the usage of the Smith machine is simple: the machine creates stability for you by forcing you to move through a fixed range of motion. Part of the glory of a squat or bench press is that our bodies must find stability on their own. When you take a barbell out of the rack, you may feel a little bit shaky at first. Your shoulder stabilizers are working hard to prevent the barbell from yanking your arms behind you during the bench press. The same phenomenon occurs on the squat. If you can't properly stabilize your hips, you will either fall backwards or forwards, or your knees will cave inwards as you stand.
Squatting on the Smith machine is basically like telling your core to go take a nap while you do your set. You will notice that you will be able to squat significantly more weight on a Smith machine, because you don't need to stabilize your midline! As a result, your legs can concentrate solely on moving the load on your back. While this may sound like a positive, I can assure you it is not. If you want to improve your body's reflexive strength and prevent unnecessary injuries like rolled ankles, then stick to free weights.
When you're walking down the street, you are not moving on a fixed plane. Your hip adductors work to prevent excessive hip abduction, and vice versa. Your torso must rotate slightly to navigate your center of mass. These actions are innate and help create efficient movement. Similar reactions happen in the squat: your abductors prevent the ugly valgus knee position, your erector spinae instinctively push against the barbell to prevent your torso upright, and your glutes are suppose to help you extend the hips as you stand. Many of these muscles will go to sleep when you squat on the Smith machine, because they aren't necessary.
Don't cheat yourself. Wake up your stabilizer muscles and train with purpose.
Thursday, April 3, 2014
Test Your Squat
“Trust that the body is a self righting organism. Our job is to guide the process.”
-Norene Christesen, PT, DSc, CLT, OCS
Monday, March 17, 2014
Why You Need to Have a Big Butt
Having a big butt is certainly preferable for models twerking in rap videos, but it's also extremely important in athletic performance. Weather you're a soccer player, a running back or just simply working out to maintain a healthy lifestyle, you need to make sure you're giving your butt the attention it deserves.


I know what you're thinking: "But Arianna! I can squat 250 pounds. My glutes are really strong!" In a perfect world, you would achieve glute activation in the back squat, but many of the back squats I see people execute in the gym make use of the anterior quadriceps muscle and recruit minimal activation from their posterior chain. The truth is, if you are a predominantly sedentary person (meaning you sit for 4+ hours a day at home or at work), you probably don't know how to correctly activate your glutes because you're not using them for the majority of the day. Fear not--you are part of the American majority who sits at a desk job all day. It's no wonder that we don't know how to activate the right muscle groups considering we don't use them as often as we should.
Underactive or weak glutes can cause a ton of problems, including lower back pain, knee pain, IT band syndrome, and a whole slew of other maladies. Your quadriceps may be strong enough to squat 250 lbs, but guess what? If you learned how to activate your glutes properly, you would easily squat over 300 lbs.
The gluteus maximus (one of three muscles that make up what we collectively call the "glutes") is the biggest muscle in your body. Now, if we learn how to properly employ the strength of this tremendous group of muscles, we are going to see some real magic happen. Whether we're doing a deadlift, a squat, a box jump or a clean and jerk, we need to learn to properly harness the power from our glutes in order to move the most amount of weight and avoid injury.
In order to utilize the strength of the ever-powerful gluteal muscles, we must focus on activating them. Some great exercises can be found in my previous article about warm-ups, but I'll list a few more that I really like here:
- Single leg or weighted glute bridges
- Banded walks
- Reverse hyper extensions
- Single leg Romanian deadlifts
- GHD raise
- Bulgarian split squats
- Reverse lunges
- Side plank with abduction
Once you learn to properly engage your posterior chain, you will see tremendous gains in strength while simultaneously protecting your body from injury. If you have humongous quadriceps and a small butt, that should be a red flag to you that your glutes needs some more attention. Channel your inner Nicki Minaj and start building a bigger booty!
Friday, November 22, 2013
Step Away From the Bar...Try a Sandbag
Conventional gyms are fully stocked with machines from wall-to-wall, racks of dumbbells and bars with an array of plates to load them. What many globo gyms lack, however, are the more non-traditional items. Toys like tires, sleds, and sandbags provide a whole new stimulus for your brain and your muscles alike.
Let's take a sandbag and a barbell of equal weights, for example. A barbell is a solid, stable object; a sandbag, on the other hand, is much more unstable. Sand may move around within the bag, forcing you to constantly move with it. Try doing a front squat with a barbell and then a front squat with a sandbag.
You will immediately notice a huge difference.
 |
| Image courtesy of Men's Health |
Sandbags, chains, ropes, kegs, pipes or balls filled with water, stones, sledgehammers, tires, and a partner (willing, of course) are all great tools to add to your training bag. These objects will really take your training to the next level, because they require significantly more core stabilization than fixed objects.
These tools allow you to challenge yourself in a new way, and they're all very cheap (or free) to use! You can be resourceful and throw some objects together that you would have otherwise allowed to collect dust in your basement.
Saturday, October 26, 2013
Brace Yourself: Focusing on Your Posture
Our posture is the foundation of every movement we make. Whether we're sitting, going for a jog, or doing a deadlift, proper spinal positioning is crucial to both preventing injury and the efficiency of your movement. The fact of the matter is that the movements you're resorting to at your computer desk are going to translate to your movements in the gym.
So what is considered "good posture?" Dr. Kelly Starrett, author of Becoming a Supple Leopard: The Ultimate Guide to Resolving Pain, Preventing Injury, and Optimizing Athletic Performance breaks it down into three easy steps:
- Squeeze your butt
- Align your ribcage with your pelvis
- Tighten your core (about 20% tension for low-impact activities like sitting, 100% for a max deadlift)
- Neutralize your head position and roll your shoulders back into a good position
Ideally, these 4 cues will lead you to a safe position regardless of the task. As I mentioned a few weeks ago in my post about core strength, a nice, strong core is essential to proper posture. Our core prevents our lower backs from arching and stabilizes our hips and shoulders. In these images, Dr. Starrett illustrates these concepts. As a point of reference, he places one hand under his breastbone (sternum) and another hand on his pubic bone. If your posture is aligned properly, your hands will be parallel to one another.
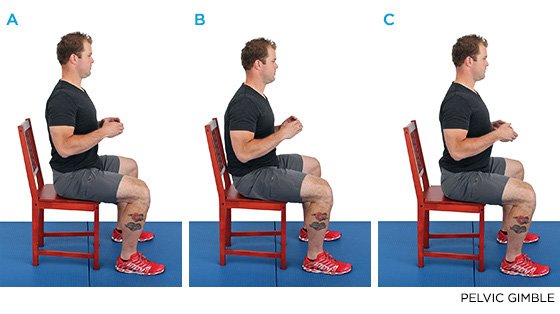 |
| Image A illustrates a properly braced spine. In Image B, Starrett rounds his shoulders, and in Image C, his lower back is excessively arched. |
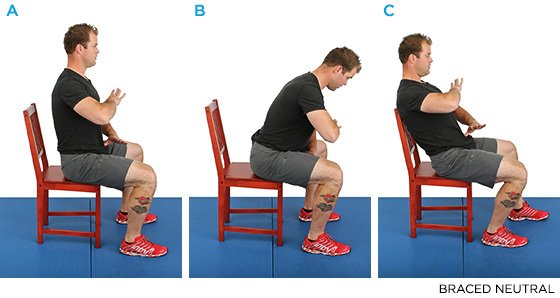 |
| Here, Kelly demonstrates all of the positions you can sit in comfortably with a braced spine. |
So next time you're sitting at your desk at work, take a moment to focus on your posture. Are your shoulders rounding forward? Are you arching your lower back too much? If you are, simply stand up, follow the bracing sequence, and sit back down.
Subscribe to:
Posts (Atom)